도안 목록으로 돌아가기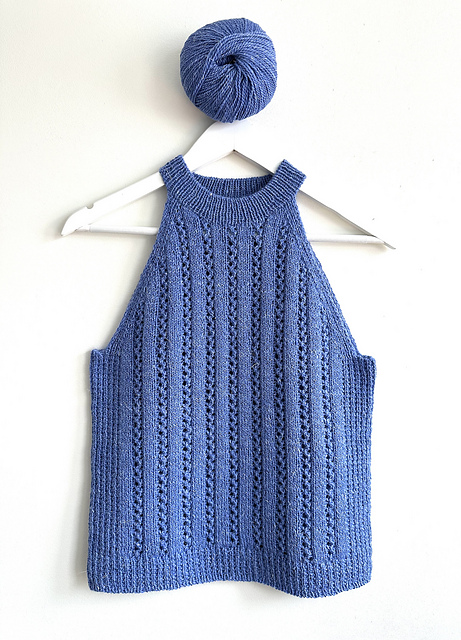



Tank/Camisole유료 도안
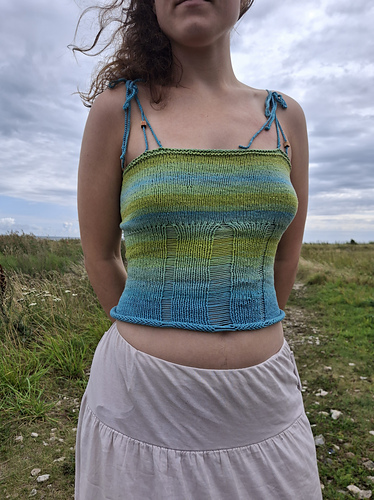
Riptide Halter
디자이너: Jennifer Shiels Toland
난이도3.1
바늘 크기
3.25mm
실 굵기중간 실 (6~8합)
(DK (11 wpi))
(DK (11 wpi))
좋아요1600
ADVERTISEMENT
도안 상세 설명 구글번역기로 번역하기
> The **Riptide Halter** is the result
> of a wonderful collaboration between
> myself and The Fibre Company. If
> you've never worked with them nor tried their
> stunning yarns, I strongly encourage
> you to do both! Thank you Daphne! x
**Riptide Halter** is a slightly cropped halter top with alternating strips of textured rib and simple lace. Like its sister garment, the Riptide Slipover, the integrated armhole edges run seamlessly into the side broken rib panels.
The Halter is worked seamlessly from the top down. It commences with the back and front yokes being worked flat separately. The back and front are then joined at the underarm and the body is worked in the round, to the hem.
The neckband is picked up from the back and front yoke and worked bottom up in the round. There are two neck options – a tighter fitting neck option, which sits higher on the neck, and a looser fitting option, which sits lower on the neck - see photos.
**EXPERIENCE LEVEL:**
Intermediate.
**SIZES:**
1 (2, 3, 4, 5) (6, 7, 8, 9, 10, 11)
Finished chest circumference:
76 (84, 91, 98, 105) (111.5, 120, 129, 136, 144, 151) cm
30.5 (33.5, 36.5, 39, 42) (44.5, 48, 51.5, 54.5, 57.5, 60.5)”
See Schematic for more detailed measurements.
Suggested fit approx. 2.5 – 7.5 cm (1 – 3”) positive ease.
Sample shown in size 2 with 5 cm (2 ”) ease.
Finished garment measurements are taken with relaxed fabric after blocking.
**YARN**
[**The Fibre Company, &Make DK**][3] 50g (125m/ 137yds, 55% wool, 35% alpaca, 10% linen). DK weight.
Sample shown in colour Potion (blue/purple).
4 (4, 5, 6, 6) (7, 8, 9, 9, 10, 11) skeins.
185 (200, 238, 265, 296) (329, 367, 412, 447, 486, 516) grams
461 (500, 597, 663, 740) (823, 918, 1031, 1118, 1216, 1291) metres
506 (548, 665, 727, 811) (902, 1006, 1130, 1225, 1333, 1415) yards
**Needles & Notions**
- Size 3.75 mm / US 5 circular needle, 80 cm / 32” length (or size needed to obtain gauge) to knit the garment.
- Size 3.25 mm / US 3 (or 0.5 mm / 2 US sizes smaller than gauge-size needle) circular needle, 40 cm / 16” length, or DPNs, to knit the neck band.
Spare needle in gauge size, and smooth waste yarn for holding live sts.
Tapestry/Darning needle
Stitch markers: 6. One unique.
**GAUGE**
23.5 sts x 33 rows/ rounds = 10 cm x 10 cm (4”x 4”) in riptide stitch pattern, slightly stretched, after blocking on largest needle. Please refer to Appendix A for stitch pattern
Tip: Block and pin swatch. Leave to dry. Please see note on gauge importance.
> **Riptide Halter:** [**JST Black sample notes**][4]
**CONSTRUCTION NOTES:**
Halter is worked seamlessly from the top down. It commences with the back and front yokes being worked flat separately. The back and front are then joined at the underarm and the body is worked in the round, to the hem.
The neckband is picked up from the back and front yoke and worked bottom up in the round. There are two neck options – a tighter fitting neck option, which sits higher on the neck, and a looser fitting option, which sits lower on the neck.
**Importance of achieving gauge**
Row gauge is very important. Achieving less than 33 rows per 10cm/ 4” will result in a deeper armhole. Some test knitters found the underarm sat too low, so the pattern was rewritten to reduce the armhole depth by approximately 2.5cm/ 1” across all sizes. About a quarter of the testers either reworked their original project or began a second halter. I can’t thank the test team enough for their dedication and time on this project!
**Casting on & Binding Off options**
There are several options for casting on and binding off the neckband, underarm, and hem.
Cast on options in the pattern include, Long Tail cast on (back) and Alternating Cable cast on (under arm & neck), and Cable cast on (front). Note: If you do not wish to use the Alternating Cable cast on, please choose another stretchy cast on.
Bind off options include regular bind off in pattern, or a sewn tubular bind off for a more polished finish.
Video links are provided in pattern.
**Yoke Raglan Increases**
The back and front yokes are worked by using a combination of increases every 2nd or 4th row, depending on size. There are two Stitch Patterns for these increases, found on pages 5 and 6: a Raglan 2 Row Inc, and a Raglan 4 Row Inc. These Stitch Patterns will be used throughout the front and back yokes at various times. Most sizes only use the Raglan 2 Row Inc.
Charts for Raglan Increases are provided in the pattern.
**Neckband**
It is a good idea to work the neckband before finishing the body, so you can try on and adjust to your desired body length. Please note that extra yarn will be required if you knit the body length longer than the measurement in the schematic.
**TIPS FOR SIZES AND MEASURING BUST**
I find the best way to measure your bust is to take a measuring tape and measure over your bra and around the back shoulder blades, at widest point. Don’t pull the tape tight. This is your bust circumference measurement, not bra size. Choose your size based on your bust circumference measurement. For example, if your bust measures 102.5 cm (41”) (at widest point) and you want 2.5 cm (1”) of inch of looseness (positive ease), then knit size 5.
[1]: https://www.ravelry.com/groups/jstdesigns
[2]: https://www.ravelry.com/bundles/the-riptide-collection
[3]: https://thefibreco.com/product/andmake-dk-yarn/
[4]: https://www.ravelry.com/projects/JSTDesigns/riptide-halter
* 이 도안은 유료이므로 Ravelry에서 별도 구매가 필요합니다.