도안 목록으로 돌아가기

 🪄 도안 확인하기
 무료
무료 무료
무료
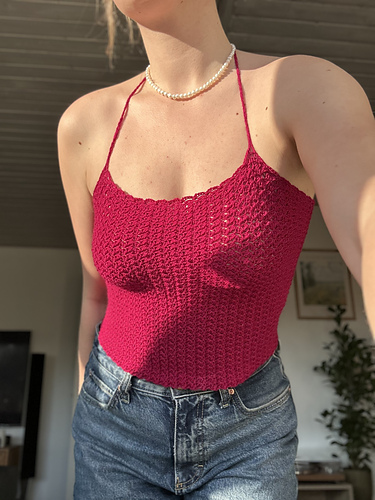
Tank/Camisole무료 도안
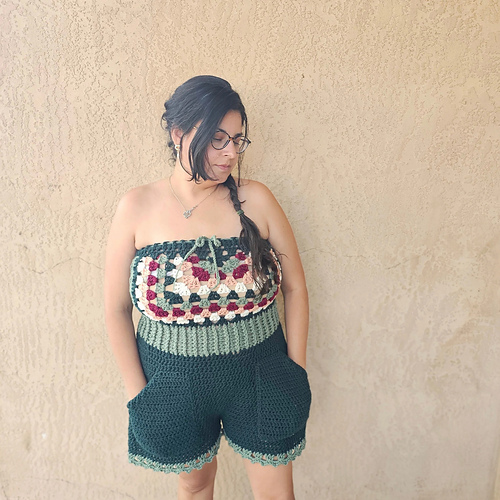
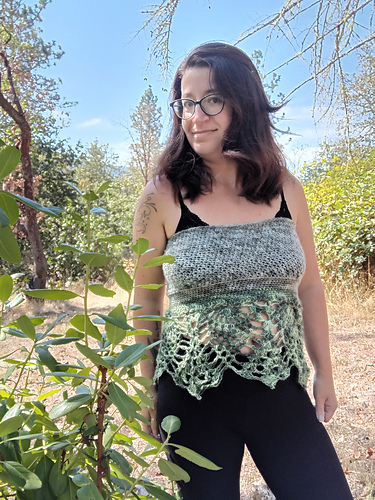
Spring Valley Bandeau
디자이너: Janine Myska
난이도2.3
바늘 크기
3.75mm
실 굵기보통 가는 실 (4합)
(Fingering (14 wpi))
(Fingering (14 wpi))
좋아요2334
ADVERTISEMENT
도안 상세 설명 구글번역기로 번역하기
**About**
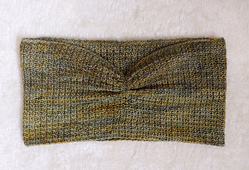
The Spring Valley Bandeau is such an easy top to make. You can use this as a template to make your own bandeau tops using any stitch pattern. It's honestly as simple as making a rectangle.. if you can crochet a rectangle, you can make this top. I worked it in a stitch pattern that alternates sc and ch, however feel free to replace this stitch pattern with literally any stitch pattern you like. I used [WeCrochet Hawthorne][1] for this top, but you can replace this with any fingering weight yarn (or any other weight of yarn if you prefer)! This piece is very customizable and you can adjust the length, the width, the stitch pattern, add straps, and add any amount of ruching you like.
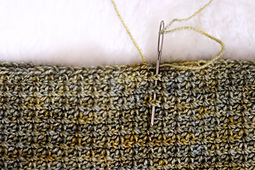
**Ruching**
The ruching (or the pinching) in the front of the top is as simple as weaving a strand of yarn in a U-shape and pulling tight. That's it!
**Sizing**
This is a simple tutorial to make a bandeau for any body. No matter your shape or size, you can customize it to fit your exact measurements. This pattern is #SizeInclusive
The sample shown is worn on a 34" bust and measures 29" in circumference, for a top that is worn with approx. 5" of negative ease. The negative ease is crucial when making this top, otherwise it will fall down your body as soon as you put it on. This may seem like a *lot* of negative ease, but this is what keeps it in place during wear. You want it to be snug to your body, but not restricting. You can try with less negative ease, for example 3-4" of negative ease, but it's better to have your finished bandeau to be on the smaller side than have it too big. If you work it too small, you can always work a few rows of single crochet to the edge before joining into a tube to add some more fabric. *You cannot, however, take fabric away if you make it too big.*
The linked blog post illustrates all of this and also how to add very simple straps if you feel you need extra support.
**How To Wear**
This top can be worn braless, with bra, or with pasties - whatever you prefer. Just note that if you plan on wearing a bra, take your bust measurement while wearing your bra. If you plan on wearing it with just pasties, make sure you take your bust measurement braless to get an appropriate fit for your body.
**Construction**
This top is worked in a simple rectangle that gets seamed together. The reason I chose to seam it vs. work in the round is so that you have another chance to adjust it once you're finished. You can also work it in a spiral or in joined rounds, but this eliminates any opportunity to adjust it at the end. If it's too tight, you won't have a chance to add more fabric along the edges just in case. But, if you are comfortable with this and are quite confident you can achieve the proper measurement, go ahead and work in a spiral or in joined rounds if you prefer this.
**Yarn**
*[WeCrochet/Knit Picks Hawthorne][2] yarn in colourway [Eliot][3]*
Since this design is a tutorial-style that you make to your measurements, the yardage provided is only an estimate. The total yardage depends not only on your bust measurement, but your desired length. My top shown used 76g or 275yds. This equates to about 3/4 of one skein of the recommended Hawthorne yarn.
I usually wear a size small, and my top is worked quite short. I would say the yardage would range from 275-1000yds (or 1-3 hanks of [Hawthorne][4]) to fit sizes XS-5XL.
Note - I used the [WeCrochet/Knit Picks *Hawthorne*][5] colourway "Eliot".
[1]: https://shrsl.com/25dnw
[2]: https://shrsl.com/25dnw
[3]: https://shrsl.com/25dnw
[4]: https://shrsl.com/25dnw
[5]: https://shrsl.com/25dnw
* 버튼을 누르면 Ravelry 다운로드 페이지로 이동합니다.
(주의: 디자이너의 설정에 따라 무료 기간이 종료되어 유료로 전환되었을 수 있으니 이동 후 무료 여부를 꼭 확인하세요!)
비슷한 느낌의 도안들
옆으로 밀어서 보기 →Hanging Wisteria Dress
by Tweedle Tats
Primrose Peplum Top
by BaeCrochett
Mini May Tank
by Michelle Jones MMMaking
Fairy Fae Top
by HopieDope Official
10831 Lace Me Up Tube Top
by Sirdar
무료Crochet top
by Nikita_crochets_
무료Spring Valley Bandeau
by Janine Myska
Sweet Summer Tank
by Ashley Rivas
Not Ya Granny Duo
by Maria Teresa Trujillo
Helen Top
by Sam Quint