도안 목록으로 돌아가기

 무료
무료 무료
무료
 무료
무료 무료
무료 무료
무료
Child유료 도안
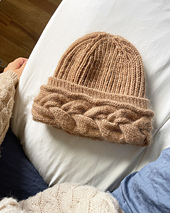
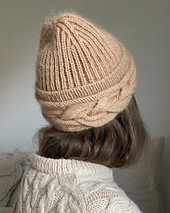
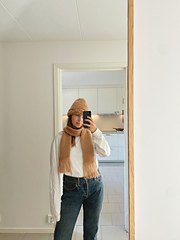
Braided Beanie
디자이너: Wool & Beyond
난이도6.4
바늘 크기
4mm
실 굵기중간 가는 실 (5합)
(Sport (12 wpi))
(Sport (12 wpi))
좋아요635
ADVERTISEMENT
도안 상세 설명 구글번역기로 번역하기
**BRAIDED BEANIE**
*A beanie in brioche stitch with a unique, cabled brim.*
Sizes: Toddler/Kids (Kids/Smaller Adult) Adult
Head circumference: 48-54 (54-58) 58-62 cm
Gauge: 18 sts x 40 rows = 10 x 10 cm in brioche stitch
Needles: 4 mm circular needles, 40 cm cable or longer for magic loop
3.5 mm circular needles, 40 cm cable or longer for magic loop
Material:
100 (100) 150 g Majo Garn Fine Merino (50 g = 175 m)
AND 50 (50) 50 g Majo Garn Pearl Mohair (25 g = 210 m)
*...or yarn that gives the same gauge!*
**About the pattern:**
Braided Beanie combines a bunch of fun knitting techniques to create a sophisticated and detailed hat. First you work the cable back and forth which form the bottom of the brim. To join the short sides of the cable you sew the ends together using Kithchener’s stitch. Then you pick up and knit sts along the side of the cable to make the brim with the rolled as well as ribbed edge. You then pick up and knit sts along the other side of the cable to work the main part of the hat. The first part is worked in 1:1 rib to create a nice fit around the head, and then you switch to brioche stitch to work across the visible part of the main part. Lastly you shape the top of the hat with decreases.
//
**BRAIDED BEANIE**
*En mössa i patentstickning med ett unikt, flätat brätte.*
Storlekar: Barn (Tonåring/Vuxen) Vuxen
Omkrets huvud: 48-54 (54-58) 58-62 cm
Stickfasthet: 18 m x 40 varv = 10 x 10 cm i patentstickning
Stickor: 4 mm rundsticka, 40 cm kabel eller längre för magic loop
3.5 mm rundsticka, 40 cm kabel eller längre för magic loop
Material: 100 (100) 150 g Majo Garn Fine Merino (50 g = 175 m)
SAMT 50 (50) 50 g Majo Garn Pearl Mohair (25 g = 210 m)
*...eller garn som ger samma stickfasthet!*
**Beskrivning:**
Braided Beanie kombinerar ett gäng roliga sticktekniker för att skapa en sofistikerad och detaljerad mössa. Först stickas flätan som bildar nedre delen av brättet fram och tillbaka, innan ändarna sys samman med Kitchener’s stitch. Därefter plockas det upp maskor längs ena sidan av flätan för att göra ovankanten av brättet med såväl den rullade som den ribbade kanten. Det plockas sedan upp maskor längs motsatt sida av flätan för att göra huvuddelen av mössan. Den första delen stickas i 1:1 resår för att skapa en fin passform runt huvudet, och sedan görs resten av huvuddelen i patentstickning innan toppen slutligen formas med minskningar.
* 이 도안은 유료이므로 Ravelry에서 별도 구매가 필요합니다.
비슷한 느낌의 도안들
옆으로 밀어서 보기 →Melt the ICE Hat
by Paul S Neary
Musselburgh
by Ysolda Teague
Oslo Hat
by PetiteKnit
무료Fall Sunrise Hat
by Mirella Moments
무료watermelon beanie
by SheilaY2K
Weekend Hat
by PetiteKnit
무료Classic Ribbed Hat
by Purl Soho
무료Timeless Tweed Hat
by Michael Vloedman
무료Mist Lace Beanie
by Wiam's Crafts
Harlow Flip
by Andrea Mowry